 |
| The Metro, mirror glass, and me |
The Brief
The brief for Assignment One is to construct an effective workflow on a
theme of choice leading to the selection of 6-12 images to be presented as an
online gallery or as prints. All the steps in the workflow are to be listed and
a short comment to be written against each describing what was done. An
explanation of how this workflow differs from others' and personal adaptations
are to be included. Finally, we are to reflect on how well this assignment
meets OCA assessment criteria (essentially, grading our own assignment).
The brief is actually is a bit confusing in at least one respect. I wrote about this at the OCA Photography Forum:
Explain how you think your workflow may differ from others' and what adaptations you made to suit the way you yourself take and process photographs.
A model workflow, against which one can compare seems to be assumed. However, such a model is not described in the course notes, nor so far as I have ascertained in any of the Essential Readings. I will be doing street photography for this assignment. Is there a model workflow for this kind of image making? Or should I be researching the workflows of street photographers who publish this kind of information? (Not a bad idea, I know, but obviously more time consuming. Anyone reading this with leads, please post them here!) Or should I just be imagining how other photogs might be doing this (the inclusion of may suggests this possibility) in order to say something about how I do it?
Suggestions have included analysis (interpreting the requirements), considering how workflow may have changed, and having a look at workflow outlined in Thomas Leuthard's Going Candid (a book I read some months ago and which didn't make much of an impression).
____________________________________________________________
We'll start with Leuthard, who conceives his workflow as three processes:
1. Training
and planning
2. Image
creation
3. Distribution
Actually, I find my workflow not all that different from Leuthard's. I usually have some plan when I set out, even if it is as general as shooting an area of my neighborhood underrepresented in my image collection. I am just now getting to the point where I have canvassed my neighborhood and may begin considering more thematic excursions, going out to shoot specific subjects such as transport, pedestrians, buildings, signs, etc. I carry little, shoot uin a variety of modes (depending on the need), and do as little post-processing as required (working only in Lightroom). Where I differ most is in distribution and sharing. I have a Flikr account and have been adding images here for the past few months, but I don't do much to let others know where to find the images. This is most probably lack of confidence.
Besides reexamining Leuthard, I have also googled [street photography workflow] to see if anything of interest might turn up. (I may be off the mark here in searching for genre-specific workflows. I'll get to that in a bit.) Canadian photog Peter Prosophos has something of a contrary opinion, stressing that his work is considered and deliberate, a bit less off-the-cuff than Leuthard:
Simply put, consistently pleasing images are,
created, not randomly “snapped”. Of course, one may by sheer luck produce a
good image and even a work of photographic art, but it won’t happen
consistently unless you know what you’re doing.
Thomas Hawk and David Hodgson provide examples of digital workflow that might be almost generic. There is nothing about them that appears genre specific. Hawk begins with image capture, whereas Hodgson starts with post-processing. Neither discuss pre-shoot preparation. In outline form, they suggest:
1. Capture
2. Transfer
(images to computer)
3. Flag:
here Hodgson makes the suggestion of watching everything through once as a
slideshow before beginning the processing of flagging
4. Develop
5. Keyword/Geotag
6. Export
(typically to jpeg)
7. Archive
8. Publish
To that end, I will note one other source I consulted previous to starting this assignment. In his Digital SLR Handbook, Freeman outlines the following aspects of a digital workflow:
1. Planning
2. Computer
needs
3. Color
and Color Management
4. Monitors
and Monitor Calibration
5. Temporary
and Archival Storage
6. Daily
Downloads (backup)
7. Captioning
and Keywording
8. Software
9. Optimizing
10. RAW
11. Histograms,
levels, and curves
12. Shadows
& Highlights
13. Sharpening
14. Upscaling
15. Printers
16. Proof,
contact, display
____________________________________________________________
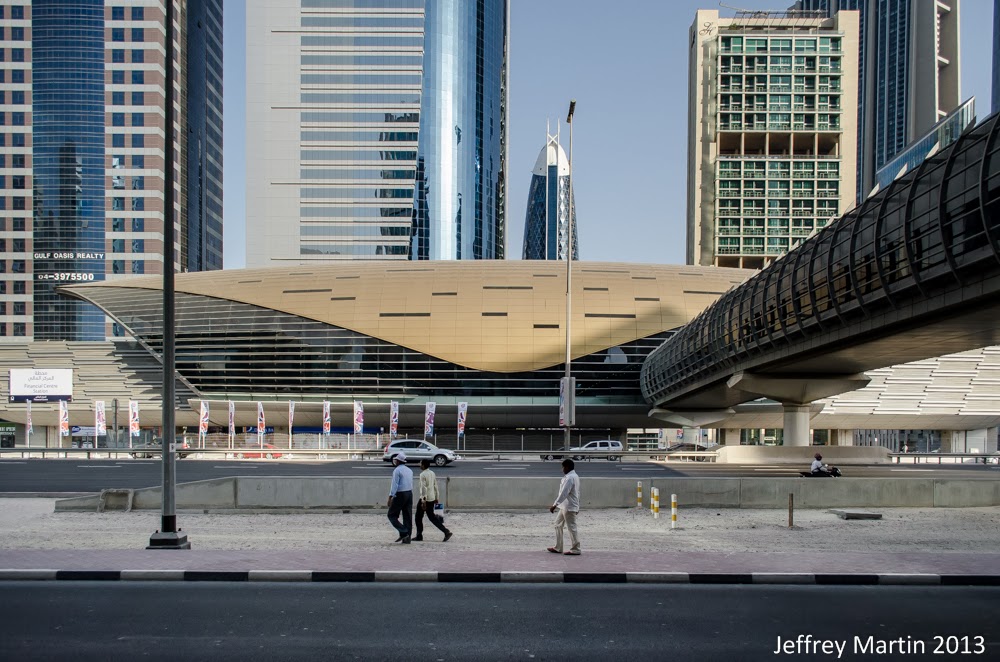
My purpose in this assignment is to produce a set of images of the Metro stations in my neighborhood. The Metro is Dubai's recently completed (and still expanding) light-rail commuter transport. I have for some months been documenting a three-station radius of Sheikh Zayed Road, a 10-lane highway bordered by rows of skyscrapers, including the world's tallest, the Burj Khalifa. I have in that time taken numerous images in and around the Metro stations. My intention with this assignment is to add to this collection with a series of images of the stations themselves, rather than the people around or in them. As part of the assignment, I will also include in the workflow a review of previous images. The purpose is to gain an awareness of what has already been done so as to focus on areas that perhaps haven't yet been explored, as well as to compare images from this shoot with previous work.
Preshoot: Planning
1.
Review all previous photos in Lightroom. These
exist in a couple of different folders. For ease of use and future reference, a
Metro collection was created to aggregate all Metro folders/images.
2.
Compile a list of images not represented in the
current collection. There are any number of images that could be added to
the collection, such as passengers, station interiors, car interiors, or
passing scenery from within the train.
3.
Decide on a series of images for this project. I
will shoot series of exteriors of the three metro stations that lie within the
range of my current shooting project. I will shoot these both in daylight and
at night.
4.
Consider any special needs for capturing the type of
images required. A tripod and a remote release will be necessary for shooting
after dark.
1.
Charge batteries
2.
Format memory cards
3.
Clean lens
4.
Get out the tripod
I will endeavor to complete this assignment in one day starting at about 16:00. My aim is to capture day and night versions of the stations. As these structures are situated on the north-bound side of the road and built only meters from office and residential buildings, I will shoot from the opposite side for a wider field of view. It will not be necessary to capture identical images and so will shoot handheld during the day, tripod after sunset. I will try to capture all the required images within one shoot, but am prepared to visit again should this be required.
Post-shoot
This process has been fairly well described in previous exercises (here, here, and here). I will not repeat it here except to describe the actual process as it developed.
Publish
Prints: I will send prints to the tutor via a UK lab.
Online: I will publish these on my learning blog.
____________________________________________________________
 |
| The bus got in the way |
The Day After
The shoot went as well as expected. I spent about four hours on the street, between 16:00-20:00, and captured 219 images, more than the handful required for this assignment.
There were two issues that I hadn't properly anticipated. One was how to include traffic in my images. The two first choices were 1) waiting for breaks in traffic to avoid shooting vehicles or 2) shooting whatever passed by. Once that choice was made, there was another: 1) freeze the cars (using high shutter speed), or 2) shoot them as ghosts (daytime) or light trails (at night). If I chose to freeze the cars, I then had to decide whether to 1) release in continuous mode to create a large collection of images out of which I could later chose one with the best arrangement of elements, or 2) try to anticipate and capture arrangements as they presented themselves. I ended up using a combination of these choices, waiting for breaks in traffic during the day and freezing when that wasn't possible, and shooting light trails at night.
The other issue was angles, or set-ups. Sitting at my computer writing my notes I imagined a straight-on view for all three stations. But with plenty of daylight hours, I played around and shot the stations from a number of angles. This turned out to have been a lucky decision, because after dark I was unable at one station to shoot from the daytime position because of buses parked in that area. With the alternate views, I could still complete my mission of capturing similar looking pairs. Moreover, some shots didn't come out as well as they looked on the LCD, but with the additional set-ups I was still able to produce three usable pairs.
One amusing result of the different set-ups can be found in the Financial Centre Station images. It appears as though light posts have been planted between the day and night photos! I had to go back and look at other photos from this set to confirm this was simply a result of a small change in position.
Import: Beginning the following morning I opened Lightroom to copy these files to my laptop hard drive and to the LR catalog. Keywords relevant to all images were included at import. The files went into a folder named for this assignment.
Sort: I then viewed all 219 images, flagging those I thought were of interest (not all of them related to this assignment). As I was using continuous release to capture many of the station images, I used LR's stack feature to create virtual piles of similar images. Once this was complete, I had created 9 stacks, deleted 44 images, and flagged 25.
Develop: I then began working on the six images that I would need for this assignment, following this sequence of actions:
1.
Auto-correct: I often do this to see what the
software will suggest and then tweak those results. If the image looks good
already, I'll make adjustments without using Auto-correct.
2.
Highlights: I sometimes reduce a bit to bring back more of
the sky.
3.
Clarity: to add a bit of contrast and definition.
4.
Graduated filter: when necessary, often in high
contrast images, to return color to the sky.
5.
Lens Correct: most often the new auto function
is sufficient, but sometimes a manual correction may be required.
6.
Detail: adding sharpening and reducing noise
Publish/Archive: Print files were uploaded to Digitalab. Glossy, 12 x 8, white-bordered prints were ordered and will be delivered to the tutor for inspection. Images related to the Metro were copied to the new Lightroom Metro collection before all image files on the laptop hard-drive were archived to external storage.
And so ends this assignment. There are a number of images left from this collection to develop and these will be included in my ongoing collection of SZR (Sheikh Zayed Road) images.
____________________________________________________________
The images
 |
| Emirates Tower Day |
 |
| Emirates Tower Night |
 |
| Financial Centre Day |
 |
| Financial Centre Night (corrected) |
 |
| World Trade Centre Day |
 |
| World Trade Centre Night |
____________________________________________________________
Outtakes
The following includes one uncorrected image from the original submission, plus three images which might have been used had I been able to capture similar day or night views.
 |
| Financial Centre Night (uncorrected) |
 |
| Financial Centre Day |
 |
| Emirates Towers Day |
 |
| Emirates Towers Night |
____________________________________________________________
Documentation
2.
Reviews at the Learning Blog since last Assignment:
____________________________________________________________
____________________________________________________________
No comments:
Post a Comment